Wednesday, April 24, 2013

How to thread your line

I have been slacklining for almost 7 years right now and still some of my favorite webbings are threaded models. I think my all time favorite is 1" Threaded Slack-Spec which is improved (stronger and more dynamic) version of classic 1" threaded tubular webbing. Recently I expended my slackline pile with other threaded models like RAGEline (1.25" polyester tubular webbing with Type-18 MKII inside), PowrLine (1" Slack-Spec inside 1.25" Tubular) and VecTec (7/8" Spider Silk inside 1" Slack-Spec).

There is quite few other threaded lines on the market for example T-Wave or EQB Element.

There is lots of reasons why I do like these lines but redundancy, round edges and good dynamics and strength are most important to me. If you didn't get the lines in one piece nice and threaded you are going to have some fun. Over many years I threaded quite few lines but never had too much experience with it. I also tried different tools and methods but just recently learned a really good method from Jerry Miszewski him self. This guy has tons of experience with threading the lines in huge amount as he runs his own slackline company Balance Community. I had a chance to test this methods by myself. In less then one day Jerry and I threaded over 4000 feet of RAGEline and my new 55m piece of VecTec. Obviously both of us were tired afterward but we had a good rhythm and everything worked really well. Naturally normal users will thread one line at the time so we'll focus on this (we can skip organizing multiple lines in boxes etc) ...

More then 4000feet of RAGEline and 180 feet of VecTec

There are two main methods two thread your line:

1) First method is when you thread the webbing directly by using a metal stick (this method works pretty much for most situation despite VecTec and really long pieces of RAGEline or PowrLine),
2) This method involves threading first long piece of cord inside your tubular webbing and then pulling the inner webbing through.

Method 1

What you will need:

- 2 Tree-Protectors,
- 1-2 slings,
- 2-3 carabineers,
- threading stick (best is around 2 meters length) with a piece of thin cord (best option I found is lash-it cord from Samson Ropes),
- splicing fid (optional),
- pliers.


HOW TO

a) cut the beginning of your outside tubular line along the length. The cut should be around 20-25cm long in middle of your webbing width. When you are done slightly melt the edges of the cut to prevent it from too much fraying,
b) stuff your inner line inside you haulbag, box or BC line-bag, while doing that try to remove all the twists from your line,
c) pack your outside and inner line and the rest of your equipment and go to the park,
d) find shaded spot (it is better to thread your line hidden from a sun so it doesn't hit up; this leads to more friction in between the lines making whole process harder),
e) find a nice tree and put two Tree-Protectors around the same height as your waist,
f) attach your threading stick to your inner webbing (in order to do that use your splicing fid or something similar to thread the thin cord from the threading stick through your inner webbing. Best is to have it 2-3cm away from the end of your inner webbing),


g) put your threading stick inside the outer webbing and thread your inner webbing through the short distance (2-4 meters),
h) rap the first sling around the higher Tree-Protector and tight the ends of your split outer webbing to the sling ends as shown on the picture below,


i) stretch your outer webbing on the ground making sure it is in line and has no twists on it,
j) clip your webbing through the carabineers place on the Tree-Protector and the sling as shown on the picture below (this should prevent the twists),


k) start threading your webbing (what works best for me is to support the end of the threading stick inside the outer webbing on my foot or the ground and then push the outer webbing down while making sure you don't get any twists until the threading stick is full of creased webbing and then slowly pull on it. If there is lots of friction and you have problems pulling your threading stick through, make a small bend at the end of it or even full bend which creates a handle and then pull again),
l) continue that process until you thread whole inner webbing through. If you're planning on melting the ends of your webbings together first pull the outer webbing with pliers. If you want to leave the ends free tie a water-knot on each end of outer webbing.

Method 2

This method works best for long distances or in situation where there is a lot of friction in between webbings. If the friction is really bad (like in case of VecTec) depending on your cord strength you might want to double or even triple it and then pull the cord through with a pulley system!

What you will need:

- 2 Tree-Protectors,
- 1-2 slings,
- 2-3 carabineers,
- threading stick (best is around 2 meters length) with a piece of thin cord (best option I found is lash-it cord from Samson Ropes),
- splicing fid (optional),
- pliers,
- long piece of cord (a bit longer then your threading webbing length or double or triple if you need stronger option).

ADDITIONAL:
- pulley system,
- ascender,
- sling + Tree-Protector,

 HOW TO

a) cut the beginning of your outside tubular line along the length. The cut should be around 20-25cm long in middle of your webbing width. When you are done slightly melt the edges of the cut to prevent it from too much fraying,
b) stuff your inner line inside you haulbag, box or BC line-bag, while doing that try to remove all the twists from your line,
c) pack your outside and inner line and the rest of your equipment and go to the park,
d) find shaded spot (it is better to thread your line hidden from a sun so it doesn't hit up; this leads to more friction in between the lines making whole process harder),
e) find a nice tree and put two Tree-Protectors around the same height as your waist,
f) attach your threading stick to your threading cord,
g) put your threading stick inside the outer webbing and thread your cord through the short distance (2-4 meters),
h) rap the first sling around the higher Tree-Protector and tight the ends of your split outer webbing to the sling ends as shown on the picture below,
i) stretch your outer webbing on the ground making sure it is in line and has no twists on it,
j) clip your webbing through the carabineers place on the Tree-Protector and the sling as shown on the picture below (this should prevent the twists),
k) start threading your webbing (what works best for me is to support the end of the threading stick inside the outer webbing on my foot or the ground and then push the outer webbing down while making sure you don't get any twists until the threading stick is full of creased webbing and then slowly pull on it. If there is lots of friction and you have problems pulling your threading stick through, make a small bend at the end of it or even full bend which creates a handle and then pull again),
l) continue that process until you thread whole cord through,
m) attach the inner webbing to your threading cord and if you can pull it through just with your hands do that (If there is too much friction what you need to do is to find another tree in line spaced a bit further then the end of your webbing, attach your pulley system and then your threading cord to your pulley system with a knot. Next pull the cord through until your pulleys system is shortened and the reset the knot on the cord and repeat until you thread whole inner webbing through. Try to pull slowly and consistently without an rapid pulls which can increase the force and break your threading cord which can happen and then you have to start over from the beginning),
n) If you're planning on melting the ends of your webbings together first pull the outer webbing with pliers. If you want to leave the ends free tie a water-knot on each end of outer webbing.

I hope this post helped you to understand and mastering the threading technique. Next tutorial coming soon! This time on: how to set up rodeo line.

Peace & SlackOn!
Janek

US Trip 2013 - Take 6; Bay Area Chillout Part 1; 'Hole Rock' Highline

We had a lazy start after the day before when we rigged and seshed 'Unicorn Graveyard' Highline. It took us long time to wake up, eat breakfast and so on and when we showed up at the Bridges Rock Gym it was almost 2pm. Damian was ready to gave up on us, but we spoke for a short moment and decided to go on a REALLY fast run.

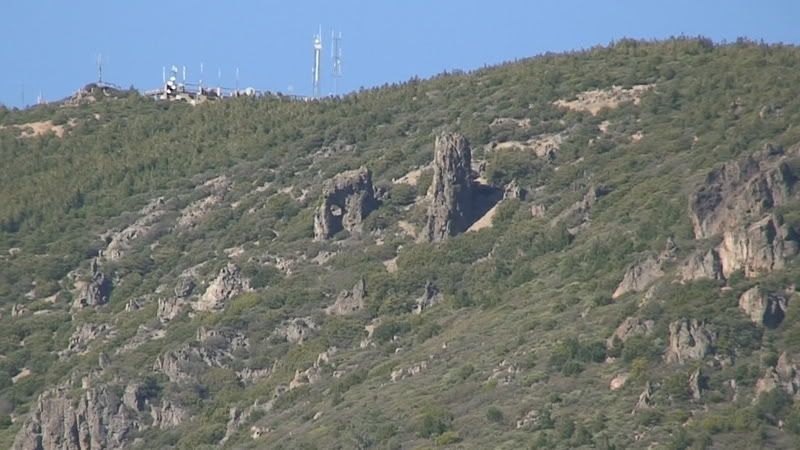
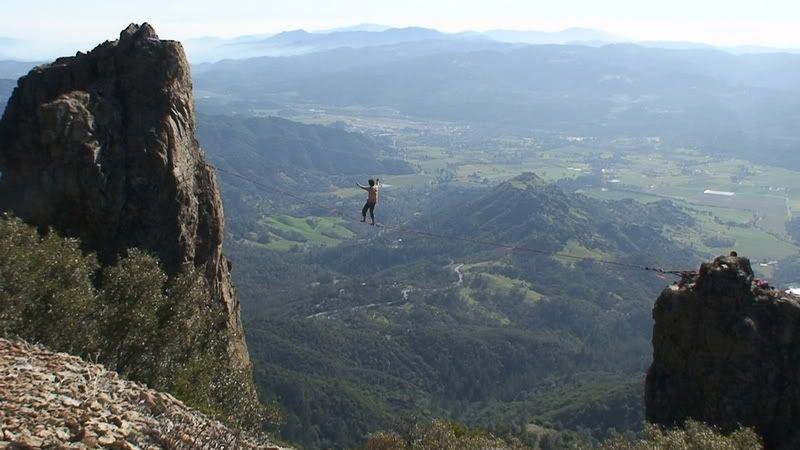
We were getting ready for the 'Hole Rock' Highline (23m L/21m H/1219m of exposure). The line with which I had unfinished business since my first trip to USA in 2007. After our Yosemite trip Damian Cooksey, Jon Ritson and I went to bolt and rig this line on Mount Saint Helena. It was a really hot day, the hike is not so short and the last part of it is brutal scramble through sharp and spiny chaparral. The time in Yosemite had us in the mindset that we didn't need to carry water. Unfortunately on Mount Saint Helena there is no springs and we had 1/2 liter of water in between three of us. We finished finding and scoping the line but we had no power and time to bolt, rig and walk. Jon and I were so dehydrated we almost passed out.

Soon after that Damian went back to finish the line together with Pierre Carrillo, Andy Lewis, Jenna and others. I always wished I could be there and during that trip I could finally get a second chance.

From the left; The Hole Rock and The Hailstone Rock
Damian Cooksey putting up FA of the 'Hole Rock' Highline (Jan 19, 2008)

More info about the line:
- link 1,
- link 2 (go to the 7th page).

This time after chaotic but really fast gear preparation DamianAlex, Jared, Jordan and I were off for a late afternoon adventure. We were unaware it's not such a fast drive and approach but we knew we can do it if we are fast. The way there was really funny. Swearing at bad traffic, talking stupid stuff and joking all the way to our destination. The talking was over as soon as we started hiking. Deadly pace killed all conversation and everyone was focused on just going fast and catching a breath. The bushwhacking and loose rock sliding at the end was kind of funny experience but I wish I had my long pants on for that. We were under Hailstone Rock exactly after one hour - not bad!

Alex almost at our spot (photo Jordan Tybon)
Rock-Skiing ... (photo by Jordan Tybon)
Re-packing next to the Hailstone Rock (photo by Jordan Tybon)

Immediately we started setting up the line. I forgot how beautiful this place was and about red ants too ;) ... Damian went to not tensioning side and Jordan and I accompanied by or small monkey Alex, finished the rest of rigging.

Rigging the Hole Rock side (photo by Jordan Tybon)

Together with unpacking, sorting gear and rigging we were done after another hour. I got the privilege of going first so I did and sent OS-FM in an ankle leash. It was a great feeling.

Ankle-leash OS-FM (photo by Jordan Tybon)

Jordan went next in a swami sending the line same style with no problem. Alex was next in line  and put some great effort. We were all supportive and I must say Damian is a great mentor for this young man. Even though this young, amazing slackliner didn't get it this time he stood up and walked it few steps the way back to anchor. Congrats Alex! I am sure you will send your first highline really soon. Keep on believing, get on something short and exposed and after you get it, everything will be all of the sudden way easier and different ;) ...

Jordan as a swami-ninja
Alex getting ready ... (photo by Jordan Tybon)
Alex on the line ... (photo by Jordan Tybon)

It was almost already dark and a bit windy but I felt good so I walked the line freesoloco-FM. It was already after 8pm and we had to leave as soon as possible. Bushwhacking in a dark was a bit dramatic and painful at the times but finally we made it to the main fire-road and could switch of our headlamps hiking down in a bright moonlight. We got back to Berkley, rode Alex back home (we're hoping his mom wasn't too angry that her son was so late) and went to crash in Oakland at our friends place. Next day at the morning we left back to Lodi/CA.


That was some amazing times. I am really glad that I had a chance to meet an old friend and some new people too. BTW I think Damian will be coming to Urban Highline Festival this year for the 5th edition of our event. He'll have some cool presentation and a movie to show. Get excited!

Peace & SlackOn!

Sunday, April 21, 2013

US Trip 2013 - Take 5; Bay Area Chillout Part 1; 'Unicorn Graveyard' Highline

As soon as we got back to Lodi from our 2-day quickie in Yosemite Valley the weather decided to get windy again (sigh!) ... Faced with non skydiving conditions we were forced to continue the rage ;) Faith unexpectedly had to leave to Austin because of the important personal reason so we couldn't enjoy this time together. Short conversation with Jordan made everything clear and after a quick call to my old friend Damian Cooksey we were on out way to San Francisco. Sitting in a car I was excited about meeting him again after almost 3 years. Damian has been an mentor and inspiration to me for a really long time, we shared some amazing times during our trip in 2007 and other places. Actually he never stops inspiring, lately establishing and sending long 'Yosemite Falls' Highline which is double length of original line ...

While sitting in a car I was wondering how he is now and going through the old memories. We arrived in Berkley at the Bridges Rock Gym late afternoon, met up with Damian and Alex and spoke for quite a long time. I was glad to see Damian being happy and full of energy. We made some plans for next visit in Yosemite and I am truly glad Damian will be there with us. Next we went quickly to pick up Max and Jared from Oakland and rode back to the Gym to slackline and boulder for the rest of the day. Bridges Rock Gym is such a fun place to play. We climbed bunch of problems from V1-V7, tricklined, slacklined and even set up small and fun rodeoline.

Rodeo surfing
Getting close to the wall ...
Max on the fun V4 arete
V3 ...
... fun dyno
Jordan crimipin' on a hard V7

Damian and his fiancee Gail invited us for dinner. We enjoyed amazing home made pizza, had a good conversations, played with two adorable dogs and made plans for the next couple days.

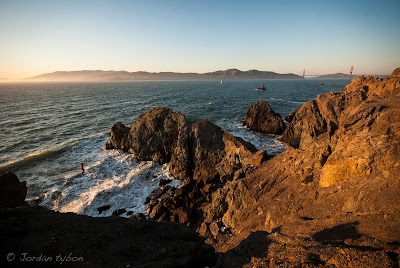
After I've seen video of Faith and other peeps sending 'Unicorn Graveyard' Highline I immediately put it on my 'to do'list. Now we had a chance to repeat that amazing line laying next to the Pacific Ocean with the overview at Golden Gate Bridge.


We started next day repeating the session at the Bridges Rock Gym and then together with Max and Jared went to set up this gorgeous line. Both sides offer natural anchors. You just have to sling some boulders and it is ready. The line it self is 41m long and around 20m high. We rigged the line with Type-18 MKII and dynamic rope back-up (8.5mm diameter). It turned out to be perfect set up and the tension we got was just right.

The way down ... (photo by Jordan Tybon)
The spot (photo by Jordan Tybon)

Before I had to send the line I realized I forgot my mp3 player from a car. It actually turned out to by really nice experience. Surprisingly it was calming to hear the power of the ocean, waves smashing against a coast underneath your feet. It was unforgettable sensation and it brought me lots of joy and smile on my face.

Rigging the tensioning-side anchor (photo by Jordan Tybon)
Windy day on the coast (photo by Jordan Tybon)
Back-up?! (photo by Jordan Tybon)
Tensioning our beauty (photo by Jordan Tybon)

I crushed the line OS-FM and so did JordanJared and Max cruised the line afterwards. We spent whole day playing on the line and getting more walks on it. Both Jordan and I sent in a swami-belt, then just before the day was over I had a walk in an ankle-leash. Jordan got some cool exposure turns in direction of setting sun. That was just amazing. I love the sunsets in this place.

Jared just before stepping off the cliff (photo by Jordan Tybon)
Jared sending (photo by Jordan Tybon)
Sending the line in an ankle-leash (photo by Jordan Tybon)
Ankle-leash FM walk (photo by Jordan Tybon)
Jordan and the epic sunset exposure turn (photo by Jared Alden)
Maxwell heaving fun on the line (photo by Jared Alden)

We finished the day stuffing our stomachs with delicious mexican food and chilling at really cool house together with Jared and Max.

Stay tunned for a full photo gallery on our teams WEBSITE!

Peace & SlackOn!
Janek

Saturday, April 20, 2013

US Trip 2013 - Take 4; Two-Day Quickie with Yosemite Valley

It has been already a week since Faith, Jordan, Andrew and I went together to Yosemite for a two day adventure. The plan was to send 'Yosemite Falls Classic' Highline and set-up and get some practice walks on 'Lost Arrow Spire Classic' Highline. We decided for that quick weekend action because of the super-windy weather in Lodi/CA which made it impossible to jump and land safely at the dropzone.

Our car 'Karl' ready for the Yosemite adventure photo by Jordan Tybon)

I have unfinished business with 'Yosemite Falls Classic' Highline since 2007 when Damian Cooksey, Jon Ritson and I bolted and established this line. During this trip I've sent the 'L.A.S. Classic' becoming 1st Pole to walk it and 4th person sending it OS-FM. Although, even I tried really hard, and got 3/4 of the line I couldn't send the Falls line. At that time my longest highline was 20 meters long. Heavy 'Yosemite Falls' Highline rigging (threaded tubular + tubular + 11mm diameter dynamic rope back-up) and massive exposure stopped me. The only people to send at the time where Damian Cooksey (FA, OS-OW&FM) and Corbin Usinger (OW).

Sending the 'L.A.S. Classic' Highline back in 2007

Compilation of Damian Cooksey sending the 'L.A.S. Classic' in 2007

We arrived in Yosemite pretty late and missed closing hour of Wilderness Center by just like 10 or 15 minutes. We registered that day but couldn't get the bear-containers without which we couldn't start hiking up the Yosemite Falls trail. Having no choice we decided to camp one night at legendary Camp 4. It was nice feeling to be back again together there after three years. After setting up tents we cooked amazing dinner to get the power needed for the next day battle.

Organizing and packing gear at the morning (photo by Jordan Tybon)

I woke up at 7am, ate quick small breakfast and started organizing and packing the gear. Our common friend Dave Meyers arrived in a middle of the night together with his girlfriend and few other friends. The plan was to get the bear-boxes at 9am when the office opens but of course we finally it took us way longer and eventually started hiking up the trail at 11.30am.

Faith hiking the last brutal part of Yosemite Falls trail (photo by Jordan Tybon)

I always forget that Yosemite Falls trail is no joke with a heavy haulbag. On the way back met bunch of other slackers I never seen before. The last part of the Yosemite Falls is brutal switch-back in a full sun and on a shitty annoying trail. I was slowly moving forward and finally reached the top after 1 hour an 50 minutes. Not bad considering that was my first hiking in a long time. I went down to Yosemite Falls line to say hello to everyone and see how is the line and the conditions.

Jordan's best friend ;) ... (photo by Jordan Tybon)

I always forget that Yosemite Falls trail is no joke with a heavy haulbag. On the way back met bunch of other slackers I never seen before. The last part of the Yosemite Falls is brutal switch-back in a full sun and on a shitty annoying trail. I was slowly moving forward and finally reached the top after 1 hour an 50 minutes. Not bad considering that was my first hiking in a long time. I went down to Yosemite Falls line to say hello to everyone and see how is the line and the conditions.

On top of Yosemite Falls trail, but hiking is not over yet (photo by Jordan Tybon)

Unluckily the reality was SUPER-windy. Jared Alden was rigging the 1st Yosemite Falls space-line which later he sent (4 time into exposure and twice on the way back). Faith, Jordan and the rest of the crew got to the top soon after me. We set up the camp, left the camping stuff, re-packed again, snacked on something and went straight away to rig the 'L.A.S. Classic'.

"It's right there!" (photo by Jordan Tybon)
Almost ready ... (photo by Jordan Tybon)

It's always really cool to see Lost Arrow Spire emerging while you walk down the slab. I love the view from there. I teamed up with Dave to climb and rig this highline. Faith helped us on the flake side. After organizing the gear we rappelled down building the flake anchor on the way.

Building the anchor (photo by Jordan Tybon)

Climbing went pretty fast. I lead all three pitches mixing free and aid climbing on the way up. It was really fun experience and now I have a beta to do it MEGA-fast for the our 24 hours highline run in Yosemite Valley. On the last pitch Dave had to fight a bit with the trailing rope which got stuck somewhere around the corner so we finished rigging the Spire in a dark.

First anchor (photo by Jordan Tybon)
Second anchor (photo by Jordan Tybon)

We got to the camp around 9.30-10.00pm ate as much as we could and crushed right away. We also came to realization we didn't bring enough food ...

After long and healing sleep we got up, ate breakfast and slowly starting hiking up to the Lost Arrow Spire. Bunch of people woke up at the morning and sent it already but I was feeling pretty destroyed after really intensive day before. Bunch of friends send the Spire for the first time. Andrew crushed it sending OS-OW and FM, Dave also sent FM, and another girl (Sara) sent the 'Lost Arrow Spire' OS (OW)!

I got on the line and sent it twice in a belt-loop swami. It was amazingly windy. The gusts where coming from all directions making the walk pretty challenging and exciting at the same time. It was an interesting experience that's for sure. I wanted to ankle-leash it really bad to get that free-solo feeling but conditions weren't even close to good enough.

Belt-loop swami on the Spire (photo by Jordan Tybon)

Faith crushed the line in a swami walking amazingly stable (but that's casual for her) and Jordan sent it few times too trying some exposure turns (scary stuff) ...

Crushing it! (photo by Jordan Tybon) 
The photographer is amazing highliner too!!

We went back to campsite for lunch and then to Yosemite Falls. Again the wind was completely crazy, the line completely loose and Nathan had to go down soon. We didn't see the point to push it especially because we'll be back in Yosemite in 2-3 weeks for a longer period of time. I would like to get on Falls line only in a swami ...

Because Falls line was not going to happen I went back to the Spire ready to de-rig. I rappelled down to the Flake anchor and squeezed in couple ankle-leash walks which just felt perfect. It wasn't so windy anymore and it felt really quite and peaceful. I think after few more highlines during this trip I should be ready for the one of my main goals for a long time which is to free-solo L.A.S. Classic. I will see, it is definitely not worth it to push it too much.

Dave also got on the line again and cruised it like a Jedi ;D After that we de-rigged the line as fast as we could got back to our campsite, packed, cleaned-up and started to hike down in a dark. Again, despite Mike who took our webbing no one waited to help us carry a bit of gear down even though so many people sent the line. I just think it is a bit funny thing ;)

I was hiking down together with Jordan, my headlamp was almost dead and I was surprised how tired I feel just hiking downhill. The part next to a fall was straight torture; slippery annoying path, bad light and the only thought in my head - FOOD ...

Eventually we all got down, packed our car and went back straight to Lodi arriving at 3am to sleep whole four hours before everyone at the dropzone wakes up and makes bunch of noise. Big respect for Jordan for staying awake and driving us back safely when all of us immediately fell asleep ... I feel bad about it.

That was a good adventure, I can not wait to go back to Yosemite and RAGE and hang out with more friends! Thanks to you all!

Peace & SlackOn!
Janek

Thursday, April 18, 2013

Lost Arrow Spire (Classic) - RIGGING BETA

Yesterday, I got back from a fun, short trip to Yosemite Valley with Jordan, Faith and Andrew Craig where we met up with bunch of friends and some new faces. That was really condensed trip. In two and half days we had to drive from Lodi to the Valley, hike up Yosemite Falls trail, climb and rig the Spire (finishing in a night), de-rig, pack, hike down in a night and drive back to Lodi. I will publish a post from this trip as soon as Dave is done editing some of the pictures.

Yosemite Falls ... You can see Lost Arrow Spire in a top-right corner of the picture (photo by J. Tybon)

For me it was the third time rigging the L.A.S. Classic. I teamed up with Dave to climb and rig on the Spire side and Faith helped us on the flake site. My last visit in Yosemite was three years ago and I didn't remember lots of important details about climbing and rigging. Even though the line is only 17m long (70m H to the notch/880m to the valley floor) it is one of the most complicated rigs in the Valley. During this trip lots of friends sent the Spire for the first time and I thought it would be great to share the knowledge of how to rig the line so more people can get this amazing experience (not only of walking but also rigging it, which is way awesome!) and so I do not forget again ;) ...

Damian Czermak on the L.A.S. Classic in 2009 (photo by J. Tybon)

Author walking L.A.S. in a swami/2009 (photo by J. Tybon)

OK, let's start with what gear will you need:

HIGHLINE GEAR:
- the line + back-up (I can recommend 1" threaded Slack-Spec + Type-18 MKII or dynamic rope as a back-up or just double Type-18 MKII; it walks really nicely on this length!),
- anchors materials; DOUBLE WEBBING: 4 x WebLock (together with bow shackle) or 2 x WebLock (together with bow shackle) and 2 x Line-Locker Kit (if you use line-locker kit, fix it on the non-tensioning side --> Flake side), WEBBING + ROPE: 2 x WebLock (together with bow shackle) + 2 x 7/16" bow shackle or 1 x WebLock (together with bow shackle) and 1 x Line-Locker Kit + 2 x 7/16" bow shackle (if you use line-locker kit, fix it on the non-tensioning side --> Flake side),
- leash rings + leash,
- 4 x cam # 3 + metal connector (don't use aluminum carabiners!), you can use for example 12mm Delta Quicklink or steel carabiners,
- 8 to 9 tree-protectors which you can easily rap around spansets and stuff,
- light pulleys system with lineGrip works best (+multiplier),
- 3 x 12mm Delta Quicklink or steel carabiners + 2 x Oval Quicklink or steel carabiners (for back-up bolts) for the Spire side,
- 2 x 2m purple spanset,
- tape,
- highline-roller.

CLIMBING GEAR:
- 70-80m static rope or better 30-40 and 50-60m static ropes (ascending/rappelling ropes),
- gri-gri + ascenders + daisy-chains + helmet + harness + climbing shoes/chalkbag,
- cams: 2 medium size Aliens, 2 x #2, 2 x #3 & 2 x #4 camalot,
- 2 x ladder + thin wire stoppers (# 1 or #2 from BD is perfect) for adding on bolts without hangers,
- 1 x fifi-hook,
- 1 x 70m dynamic rope,
- 10 to 15 quickdraws,
- slings and carabiners to built the anchors.

Damian Czermak ready to rappel to the notch (2009, photo by J. Tybon)

Rigging info:

Approach: You want to start hiking Yosemite Falls Trail from Camp 4. If you're fast and you have a heavy haulbag you still should be able to do it in 2 hours (although more reasonable time is between 3-4h). Before you start hiking get your wilderness permit and the bear-box from the Wilderness Center. After getting to Yosemite Falls follow the trail to Yosemite Point. Soon after getting out of the woods turn right and start hiking down the slabs to the Spire. This last part will take you 15-30min.

Getting Down: In order to rig and climb the Spire you need to rappel to the notch which is around 80-90m below you. Make sure you have all the climbing gear with you and highline gear if you're planning on building the flake anchor on the way down. Attach your 30-40m static rope to one of the trees and rappel to the flake and climb your second (longer) static rope to a bolt (it's good to back it up to the first rappel rope) and rappel down to the notch. You can also start rigging the highline on the way down if you don't have someone who'll do it for you when you and your partner are climbing the Spire. If you do want to rig that anchor take 4 cams #3 with steel connectors, 2m spansets, 4-5 tree-protectors, webbing and back-up, 2 anchoring devices and a leash.

Climbing: Free-climbing the Spire is not too hard although the protection is not always the best and it takes way longer. I usually split the first pitch into two smaller ones because of the huge ledge in a middle. Your belayer can't see you and if you do fall you will definitely hit the edge (too much rope stretch). So, I think the fastest way is to free-climb the first half of the 1st pitch to the edge (the is one tricky spot, but you can pull on quickdraws - you will only need quickdraws for that part) and then partly aid and free-climb short off-width section (you will need few quickdraws and cams: 2 x #2, 2 x #3, 2 x #4 and aid-ladders). The last pitch is the longest one. It can be free-climber although again fastest way is to free-climb and aid-climb partially. It starts to the left and then follows up the tower edge. You will need all your quickdraws, two Aliens and your ladders with two small stoppers (you have to use their wires to hook your ladders on the bolts without any hangers). You can really charge fast on this pitch using this method.
IMPORTANT!: The second has to trail the end of the static rope you rappelled on and make sure it doesn't get stuck on the way up. The best way is to have it clipped to the harness through Gri-Gri so you can add or remove slack.

Route beta from web (look at last three pitches)

Rigging: After getting to the top of the Spire you will need a person on the flake site with a haulbag filled with the rest of gear you will need (pulleys system + multiplier and extra sling, 4 tree-protectors, spanset + 5 metal connectors, your anchoring devices). You have to get the haulbag and the webbing across the gap. To achieve that give the person on the flake side a bit of slack, then the haulbag and the end of the webbing should be attached to a knot on the static rope - pull it across. Now you can built your anchor. For the main you have to use 3 10mm diameter bolts (they all do have hangers) and 2 behind for back-up. Equalize all 3 bolts with your 2m spanset and clip your anchoring devices (don't forget to protect rap your spanset with tree-protectors). When you have your anchor ready you can pull the haulbag with gear and the webbing using the static rope you were trailing behind you while climbing. Then it's easy - tension your highline, back it up, taped if it's not pre-taped and it is time for epic sends!
RIGGING FLAKE SIDE: This anchor is not so easy to rig. You will need for cams #3 and if you want to have your anchor a bit lower (sitting in a vertical crack) also couple BD stopper to place in a vertical crack. What I like to to is to place my four cams on the left side of the vertical crack (looking on flake from a Spire side), equalize with my 2m spanset, protect with tree-protectors, clip the line and drop it down so it hold the anchor in place (so the cams don't 'walk' inside the crack). Remember to use steel connectors (not aluminum carabiners which usually are connected to the cams!).
The other option is to place couple cams on each side of vertical crack and two stoppers in a vertical splitter and then connect each two point and finally equalize all three with 1 meter spanset. This way the anchor is a bit lower. Back up your anchor to the bolt above the flake and the rappelling rope!

Damian Czermak on the L.A.S. Classic in 2009 (photo by J. Tybon)

Michał Korniewicz sending in 2009 (photo by J. Tybon)

De-Rigging: Before you start de-tensioning the line make sure you bring the static rope to the Spire side. What you want to do is to clip one end of the static rope to the bolt above the flake, then run it through two bolts on the spire (they are usually carabiners from the rappelling anchor) and then back to the bolt above the flake clipped through the Gri-Gri (so you can tension it a bit to tirolean easier across the rope). When you have your ropes ready back the bolt with the rappelling rope and start de-tensioning your line and the drop it. Pack the rest of your gear to the whole back and tirolean across the rope (clip to both strands!). After you're on the flake side secure your self and release the static rope. Pull it through and it is done. Ascent up the rope to the tree, clean-up and organize your gear and you can start the fun part - hiking down the Yosemite Falls trails (which usually takes place in a night) ;) ...

Author after a swami-belt ascent back in 2009 (photo by J. Tybon)

I will be back in Yosemite in about 3 weeks or so and I will rig the Spire lines at least twice so I promise to take some rigging pictures to make everything more clear. I am also adding 'Highline Guidebook' (look on the right side) section to my blog whee you can rigging info about some classic lines. I am hoping everything is clear. Comment here if you don't understand something or need more info/advice.

Peace & SlackOn!
Janek